In a first aid kit that is easy for the whole family to use
A "first aid kit" that is used only occasionally but is necessary for the house. Wouldn't it be like this if each family member puts it in their own way?

Got it ...
The messy first aid kit is full of disadvantages, such as being in a hurry but not finding it, or buying the same one. So this time, I will introduce the tips for organizing first aid kits using 100-yen shop goods.
By the way, the image is the first aid kit of the author's house that was actually messed up. I'd like to move it to a slightly smaller case, but will it all fit in?
Step 1: Determine what you need

What was in this
First , take out everything that is inside, and separate what you need and what you don't (expired medicine, one-time use, no turn, one to move to another place, etc.). You can adjust it later, so it's OK to start with a rough sketch.

It expired before I knew it

Items to be disposed of / moved on the right
Step 2: Check frequency of use
After deciding what to keep, classify "frequently used items" and "necessary items that are rarely used". In my case, I often use nail clippers, headache medicine, throat lozenges, and adhesive plasters, but cold medicines are less common.

A headache drug that never runs out

I take cold medicine several times a year
Step 3: Think about the storage method according to the item
Next, consider the optimal storage method for each.
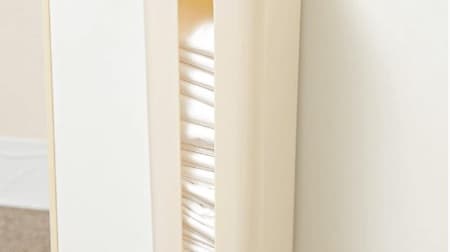
Elongated items such as nail clippers and thermometers are easier to remove, so go to a box with partitions. Similarly, here are bottles and stick-shaped gastrointestinal medicines that are troublesome when you fall down.

Stand up thin or easy-to-fall items

In front of the ones you use often
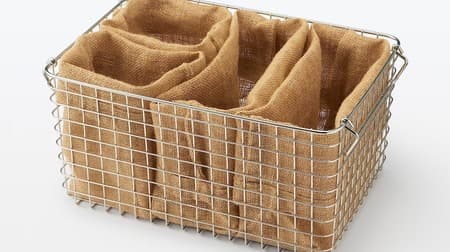
Boxed medicines and bandages tend to be bulky for their content. Depending on the size of the first aid kit, taking it out of the box can save a lot of space.

When you put it out, put it in a bag with a zipper of 100%.
Headache medicines and throat lozenges that are often used are individually placed in a "trading card case" so that they can be taken out quickly. Other cold remedies were put in a zippered subdivision bag and put together in a case with a lid.

Trading card cases that are wider than business cards are compatible with various medicines

The case with lid is convenient because it can be stacked.
If you want to take the medicine out of the box, put the cut package in it to make it easier to find. In addition, please attach the usage / dose, precautions, the place where you can know the expiration date, and the instruction manual if you are worried. By the way, you can also check the contents on each manufacturer's site.

I remember medicine in a package, right?
■ Step 4: Storage and labeling according to frequency of use
Finally, return it to the first aid kit and complete. Store frequently used items from the most convenient place , such as the front side if you pull it out and the top side if you look from above.

If it is a drawer type, from the front to the back
I plan to put this case on the shelf, so I put nail clippers and headache medicine in a place where I can pull it out a little. By placing an adhesive plaster on the top of the cold medicine, even if you get injured, you can treat it without any hassle. By leaving a little extra space, we also secured a place to put new medicines for the time being.

It is also a point that 100% does not pack when the adhesive plaster tray is removed
The finish is labeling . It is an important effort to make it possible for the whole family to find it. I use masking tape to make it easier to change, but it looks beautiful when made with a tape printer.

Masking tape that can be easily peeled off is convenient

Enter the name, genre, symptoms, etc. of the drug
Rather than making the first aid kit bigger just because it doesn't fit, you can find waste unexpectedly once you review the whole thing. After that, let's review the deadline and place at the timing of general cleaning while actually using it. If you are just as interested as the author, why don't you concentrate and try it all at once?


![[Cleaning column] 4 points to make an easy-to-use refrigerator](https://image.enuchi.jp/upload/articles/5003/cd9df7fb499fc4f1078911861073ab43_special.jpg)

![Beauty Secrets! [Cosmetics Storage] Summary of 7 tips to get a well-organized makeup collection.](https://image.enuchi.jp/upload/articles/13986/d54f0a33188cd9f630a9c1cdbc87566a_special.jpg)
![How to Steam [Potatoes] Frying Pan/Kettle/Rice Cooker Popular Recipes and Preparation Methods Old Subway Style "Oven Potatoes" and "Mr. Jansson's Seduction".](https://image.enuchi.jp/upload/articles/13963/3c8044e6c70f93cb10b5a58e2aa0ce58_special.jpg)
![Spinach Preparation] How to wash, how to boil in microwave/pan/pot (boiling time), how to freeze, and popular easy recipes/preparations! [Preserved version](https://image.enuchi.jp/upload/articles/13934/3c8044e6c70f93cb10b5a58e2aa0ce58_special.jpg)